
I fell in love with Astro after using it once, and I’ve since given one meetup talk and four conference talks about Astro. Twice at Code Europe in Krakow and Warsaw, once at WeAreDevelopers World Conference in Berlin, and a final extended version of the talk in Round Rock, Texas USA. In this article we will cover the contents of the last version of the conference talk. Also: I’m not affiated with Astro. I’m just a big fan.
What is Astro, and what makes it different?
Astro is a framework. But Astro is not yet another JavaScript UI framework like React, Vue, Angular, Svelte, Solid.js etc. and all the other ones geared towards building web applications.
Astro is a framework focused on building websites, and it’s very focused on that.
Content focused
Astro knows what it wants to do. Astro is focused on content-heavy websites.
Content-focused websites can include blogs, or even e-commerce, but I would say e-commerce is probably where you should draw the line. Anything more dynamic than that and you should probably be using something else.
But that doesn’t mean Astro isn’t good. It’s very good at the things it’s meant to do. And I believe this focus is what separates Astro from some other frameworks in the JavaScript ecosystem that are trying to do everything.
Being focused is a good thing. It means that Astro can offer a more more streamlined development experience for building content-focused websites, and provide a better result by default.
If you’re thinking about building a web application, then Astro probably isn’t the right choice. If you’re building anything content-focused, then Astro could be a great choice for your project.
Astro for single-page applications (SPAs)
Some people are actually using Astro as a starting point for their React applications.
They start a new Astro project, and just have one big React component in the page which is just their full React.js application.
So Astro can be used for many types of applications. But from a framework perspective, they are more focused on multi-page applications (MPAs, or just typical websites).
Flexible
Astro is a very flexible framework.
You can bring your own UI framework. You can choose to use something like React or Vue for specific parts of your Astro website. But it’s not tied to a specific front-end library like React or Vue. Use the front-end framework you want.
Bring your own framework. Bring your own existing components. Pretty cool.
You can even use more than 1 framework if you want to, although you probably shouldn’t, because that means you’re also shipping the source code of multiple frameworks.
Content in Astro
To create content for your Astro website, you can use a CMS, or you can use Markdown for your content, which is built in.
There are many CMS options available, including:
- Storyblok
- Contentful
- And even Headless Wordpress
Fast
Astro projects are fast to build, and also fast to use as a user.
Building my own website with Astro was a straightforward experience. I took an existing template and started adding new features based on the existing code I saw in the template.
I don’t remember needing to reference the documentation very much. It was all very intuitive.
I had the core of my new website done pretty quickly. Most of my time was spent just customising my CSS.
But like I said, Astro websites are also fast websites. Astro websites ship zero JavaScript by default.
Zero JavaScript isn’t the goal
Zero JavaScript isn’t the goal. Zero JavaScript is the baseline.
— Fred K. Schott, Co-founder of Astro
Not having any JavaScript on your page isn’t the goal. Having a good user experience is. And JavaScript can help with that.
Some examples of using JavaScript to enhance your website’s user experience are:
- client-side form validation
- search functionality without a full page refresh
- improving focus management to help with accessibility
- real-time data
Astro’s Islands Architecture
One great thing about Astro is it’s Islands Architecture.
The Islands Architecture allows you to use JavaScript in only specific parts of your page, and only for the pieces of your page that need it.
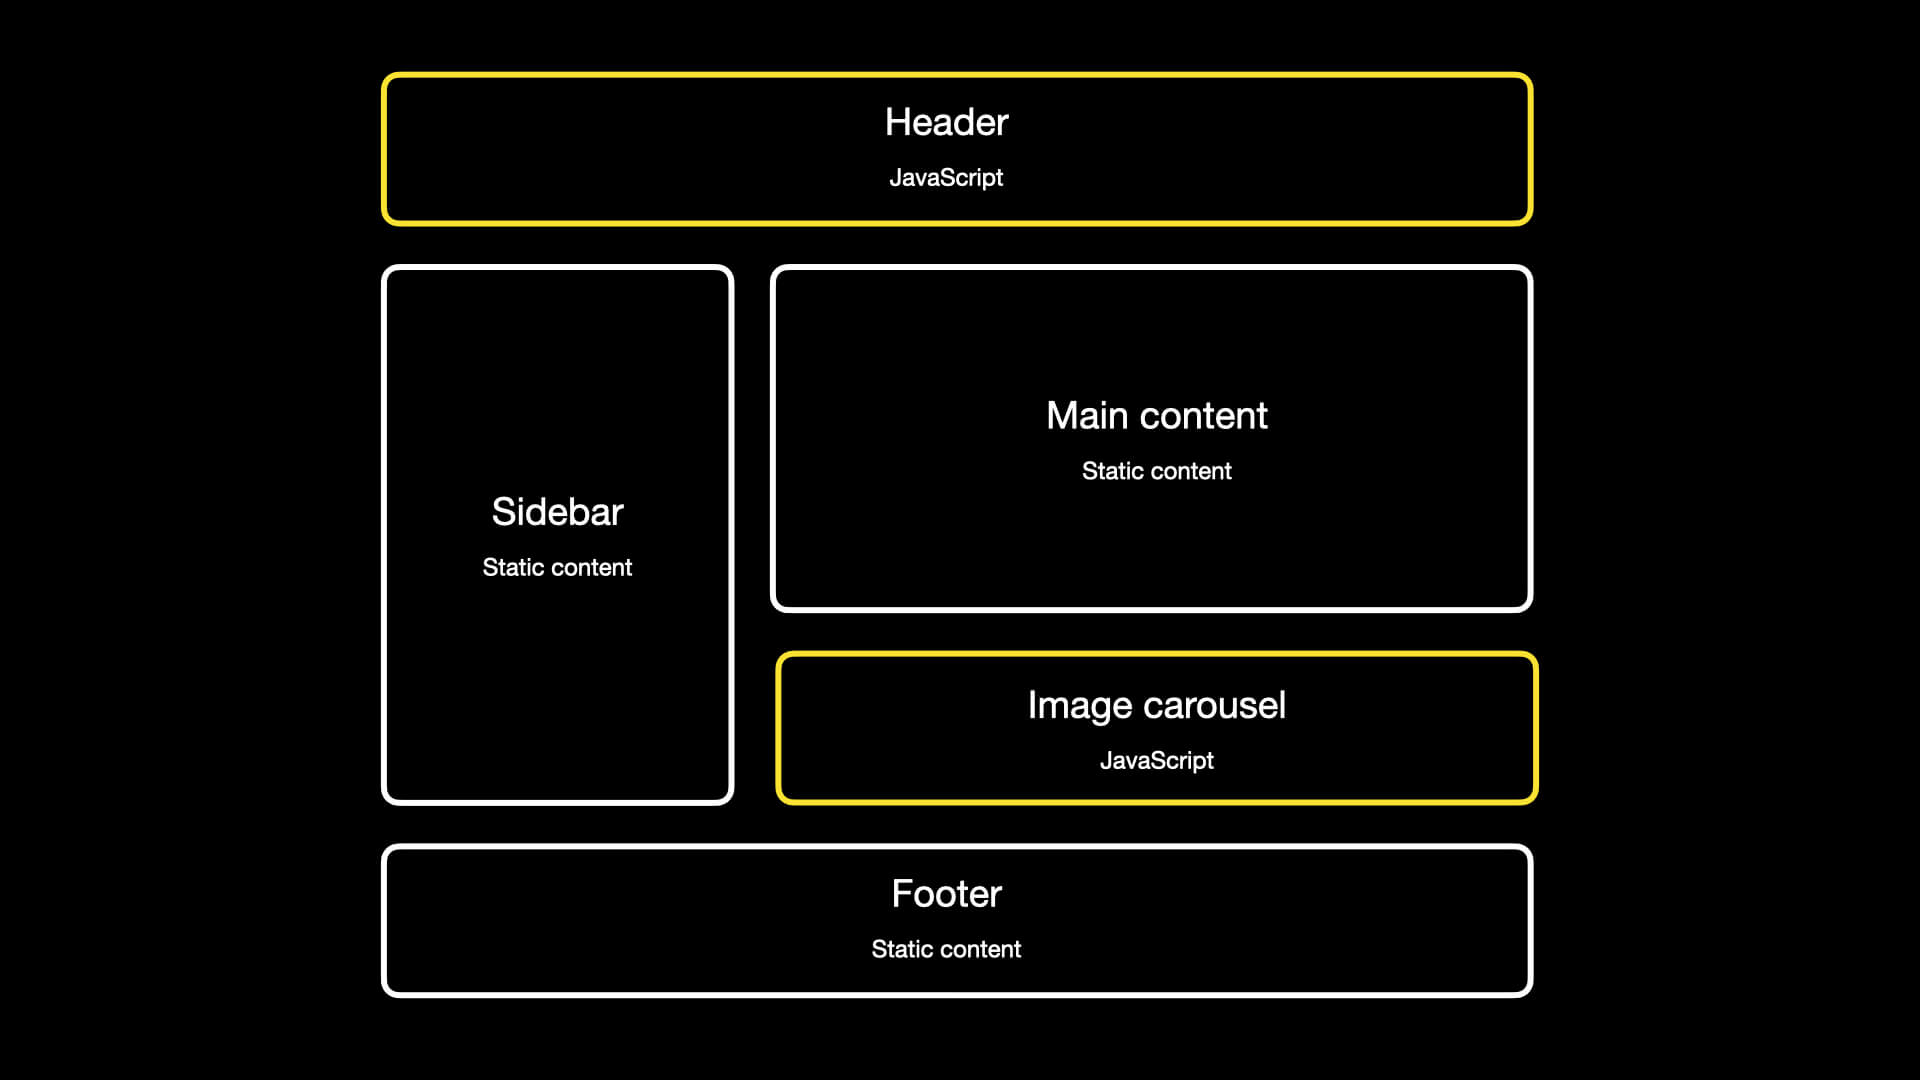
In this example page layout, there are two pieces on the page that would benefit from JavaScript: the header, and the image carousel. The other stuff like the sidebar, the main content, and the footer most likely don’t need any JavaScript.
But by default, any JavaScript you include in this component won’t be put on the page when you’re using Astro.
Client directives
To include JavaScript for your Header and Image Carousel components, Astro gives us these handy client directives.
A client directive is like a HTML attribute for your components:
client:loadis for immediately visible UI elements, need to be interactive as soon as possibleclient:idleis for lower-priority UI elements where it’s okay if they aren’t immediately interactiveclient:visibleis for this is great for UI elements that you can’t see when you open the page. So if you never scroll to them, you also never need to load the code.client:mediais for great for elements that should ONLY be visible on certain specific screen sizesclient:onlyis for this skips HTML rendering completely and only renders the code on the client
Example:
<MyReactComponent client:load />

<MyReactComponent client:idle />

<MyReactComponent client:visible />

<MyReactComponent client:media="(max-width: 50em)" />

<MyReactComponent client:only="solid-js" />
Of course Astro needs a tiny bit of JavaScript to make these work, but it’s a good trade-off to have compared to loading in a front-end library and all your component code right away.

In the example with the Header and the Carousel, the Header would use client:load because you want that to be interactive as fast as possible. Astro will include the JavaScript by default.
But the Image Carousel might not even be visible on the page for most users, especially people on their phone. The JavaScript for the Image Carousel will only be loaded once the component becomes visible for the user. So if they never scroll down, they never have to download the code.
But why Astro?
Why people love Astro? And why might you want to use it?
My previous websites
Did we really need another JavaScript framework?
We’ve been able to create websites for a long time, so maybe not.
But I remember working on my personal website.
The first iteration was written in PHP. It was completely custom, and I personally found it less than ideal to update because the content was just hardcoded into the website. Of course it was my first website, so it’s okay if it’s bad, but having the PHP server was kind of overkill for a website that was rarely ever updated and not very dynamic.
For my second iteration, I made a website using a static site generator called Gatsby.js. It was nice to be able to write blog posts and other content in markdown files. It was my first time trying the framework, so maybe I wasn’t using it in the best way, but it had an entire GraphQL layer that you needed to plug into if you wanted to do custom stuff. Personally I found it difficult to get back into after not updating that custom code for a while. And in the end I thought the GraphQL layer was complete overkill for a static website.
And that brings us to the third iteration of my website. This time, I used Astro. This time it was also a statically generated website, but the amount of complexity required to work on the website seemed much more reasonable for what I was trying to build. Of course I was a much better developer at this point, but I was able to get the website done pretty fast, with good performance, and it was my first time using it. Astro just felt right.
Integrations
One great benefit of Astro are the available integrations. Even though Astro is relatively new, it already has many integrations.
There’s a dedicated page on the Astro website where you can find all sorts of integrations including official ones and community created integrations for all sorts of use-cases.
- frameworks
- adapters for specific hosting platforms
- SEO
- Analytics
- and many other types of integrations
For my own websites I’m using several integrations:
- Tailwind CSS
- React.js
- Sitemap
- MDX (this lets me import and use UI library components in markdown files
Adding an integration for something like Solid-Js is pretty easy:
npx astro add react
npx astro add solid
npx astro add vue
npx astro add [integration]
You just run the command npx astro add solid, and a script will make the necessary configuration changes for you.
Themes
There are many premade themes available for Astro. You can get going quickly by just taking someone’s theme and rolling with it. You can have your website up in minutes.
There are themes for:
- blogs
- portfolios
- e-commerce
- documentation websites
- and many other types of themes
I kickstarted my own website by using the AstroPaper theme as a starting point, which helped speed things up tremendously.
Community
Another great aspect of the Astro is the community.
There’s a Discord server you can join where you can discuss all things Astro, see what people are building, and ask questions when you are stuck.
I’ve asked questions in there before, and people are always very nice and helpful.
Astro in the wild
There are many examples of Astro in the real world. Here is a short list of ones I found:
- The engineering blog for Firebase by Google
- The Guardian’s engineering website
- Microsoft’s used Astro for the documentation for their design system (Fluent 2)
- NordVPN has a part about social responsibility on their website
- Trivago’s engineering blog
- And even Limp Bizkit uses Astro (and they have a dark mode toggle!)
How do you build with Astro?
You can start your new application by running npm create astro@latest in your terminal.
This will download an installation script from the npm registry to kickstart your project.
It will ask you questions like.
- where it should install the project files
- which starter template you would like to use
- and if you want to use TypeScript or not and how strict you want it to be
And then it will tell you the commands you need to run to get going with your project.
When you open the project in your code editor you’ll see a few core directories:
- There’s a
pages/directory, which includes files for your pages, and this can include dynamic templates that output more than one page. - and a
layouts/directory, which are basically just components for various page layouts used in your project. - and a
components/directory, which is where you can put your.astrocomponents and components built using a UI library like React.
You can totally start your Astro project with a blank slate like that. My advice would be to not start from scratch. I recommend taking an existing theme to get your project going faster and customising that theme to your liking.
Most templates should have this in their documentation, but you can use the CLI to create an Astro project from any repository:
npm create astro@latest -- --template <github-repo>
Creating your own Astro themes
You can also very easily create your own template.
A template in Astro is just another Astro project that people can copy and edit to their own needs.
To create a template, you don’t need to put your code on the NPM registry as a package or anything.
All you need to do, is make your GitHub repository open source, and provide people with the instructions needed to use your template.
You can also submit it to the themes section on the Astro website.
Astro components
You use .astro files for Astro components, layouts, or pages.
On the left here, you see an Astro file for a page. On the right, you see a Card component as an Astro file:
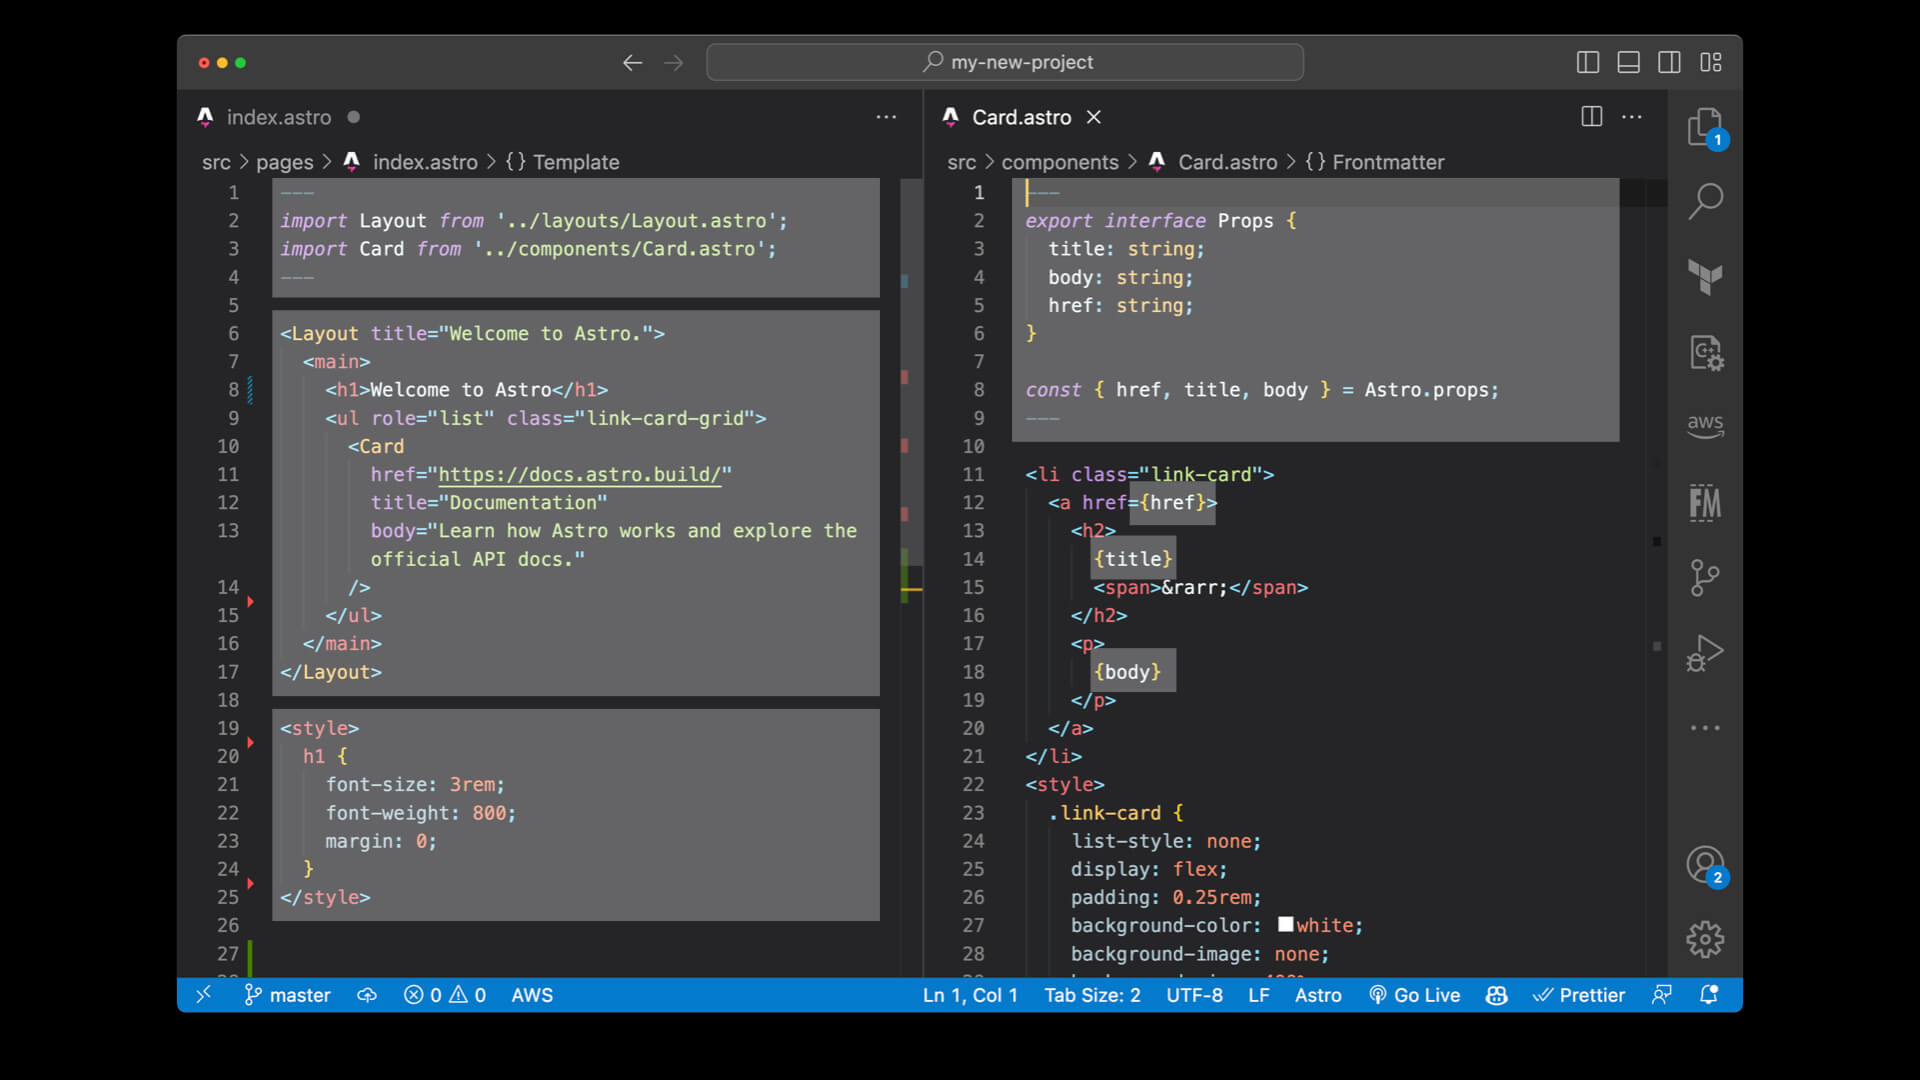
At the top is your Frontmatter between the set of dashed lines. That is where you can import components. Both .astro files and UI framework components like React or Vue can be used.
On the left you see a layout and a Card component being imported. On the right you see the props being defined which the Card component accepts as data being passed into it.
You can also write code in the Frontmatter, creating variables to use in your markup Or fetch any data you need for your component, layout, or page.
Then there’s the HTML. Not much needs to be said about that, except that you can output your variables by using curly braces like this: {myVariable}.
And at the bottom you find the CSS. This CSS can be either scoped or global. CSS in Astro files is scoped by default, which means that the h1 styling here will only apply to this page and not other pages. There are multiple ways to have global CSS, like just having a global CSS file you import on every page, or putting an is:global directive on the style tag.
You can also add a script tag in .astro files if you don’t necessarily need a UI library.
Content collections
There’s a feature called “content collections” that basically makes your markdown and frontmatter type-safe by letting you define the type of data you need in the frontmatter section in your markdown files.
This can be useful to make certain fields required, like a post description or a published date. And Astro can check these required fields when you compile your website.
When you use content collections, you add the groups of content of your website in the src/content directory. This content directory has subdirectories mapping to each of the types of content collections you define.
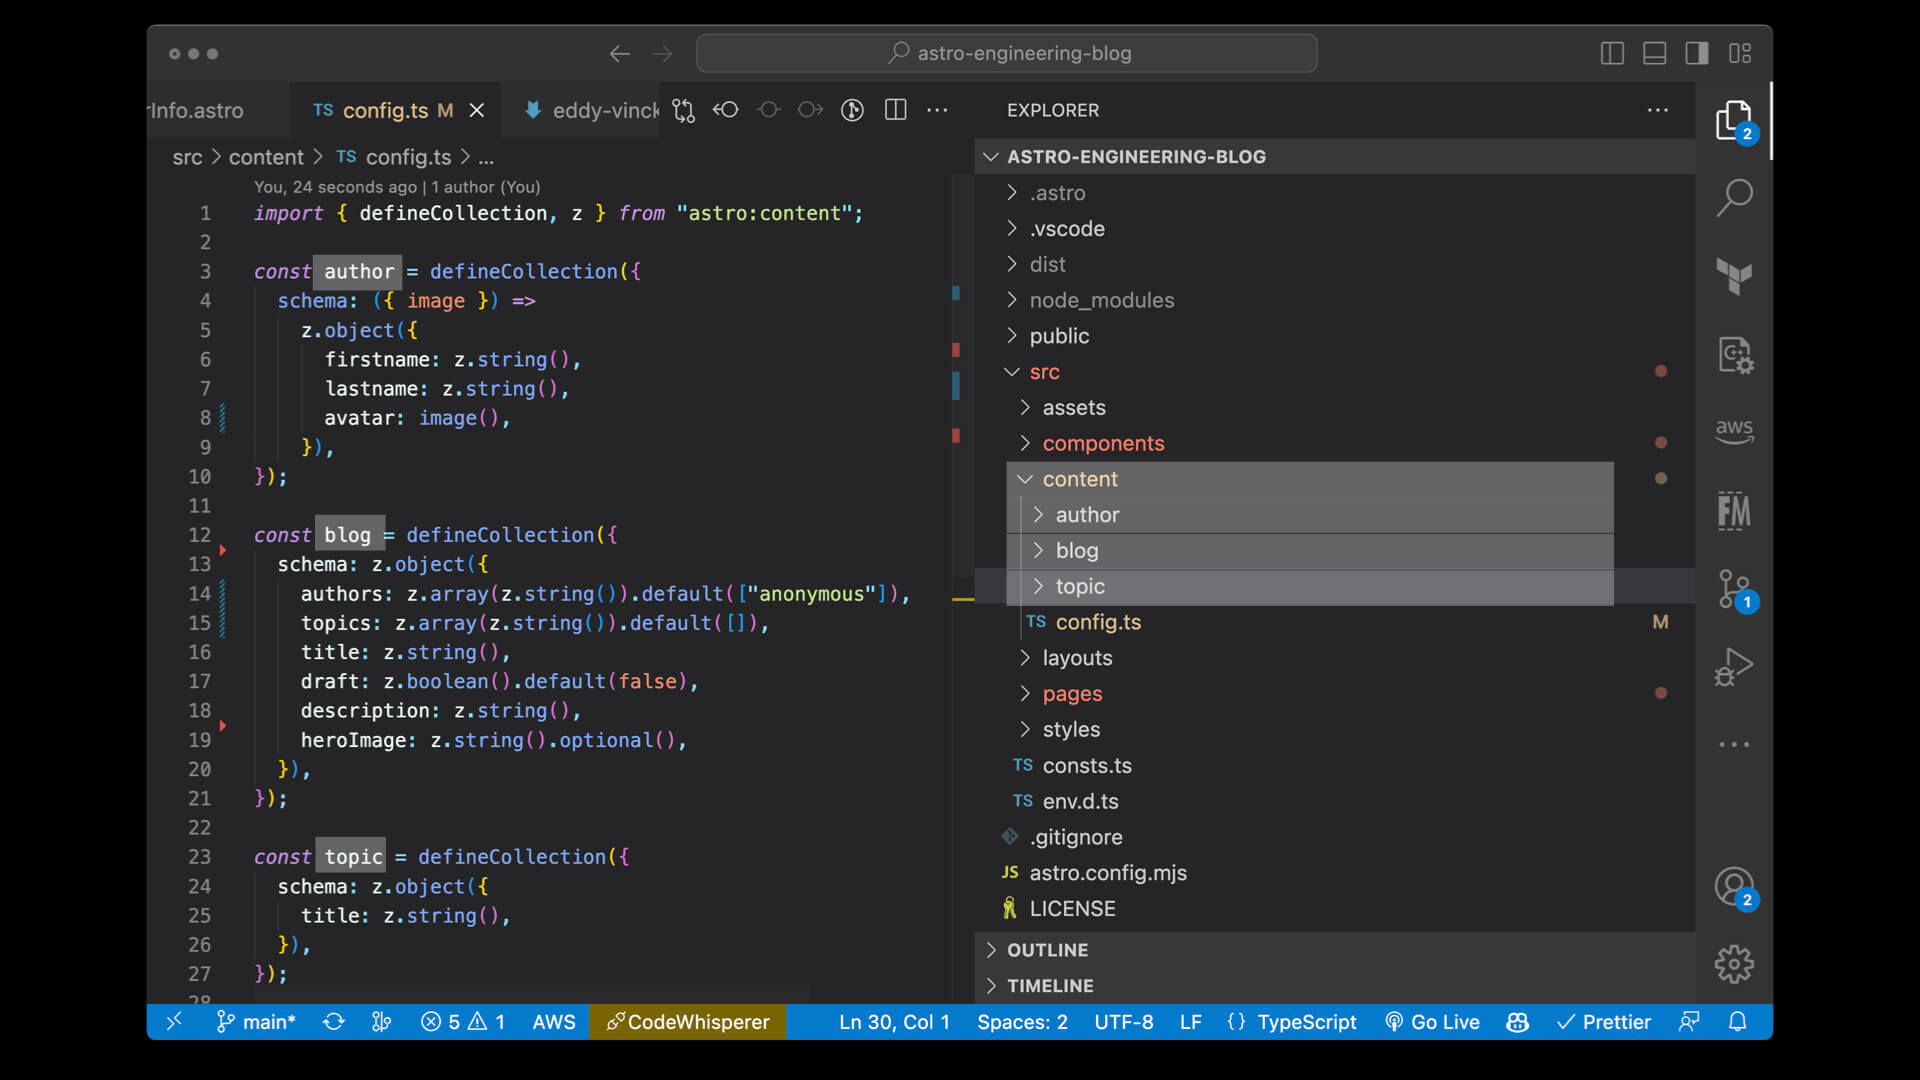
Here I have a content collection for authors, blogs, and topics, and each collection maps to a directory, and each of these directories consist of markdown files.
Here is an example of a compilation error when using content collections:
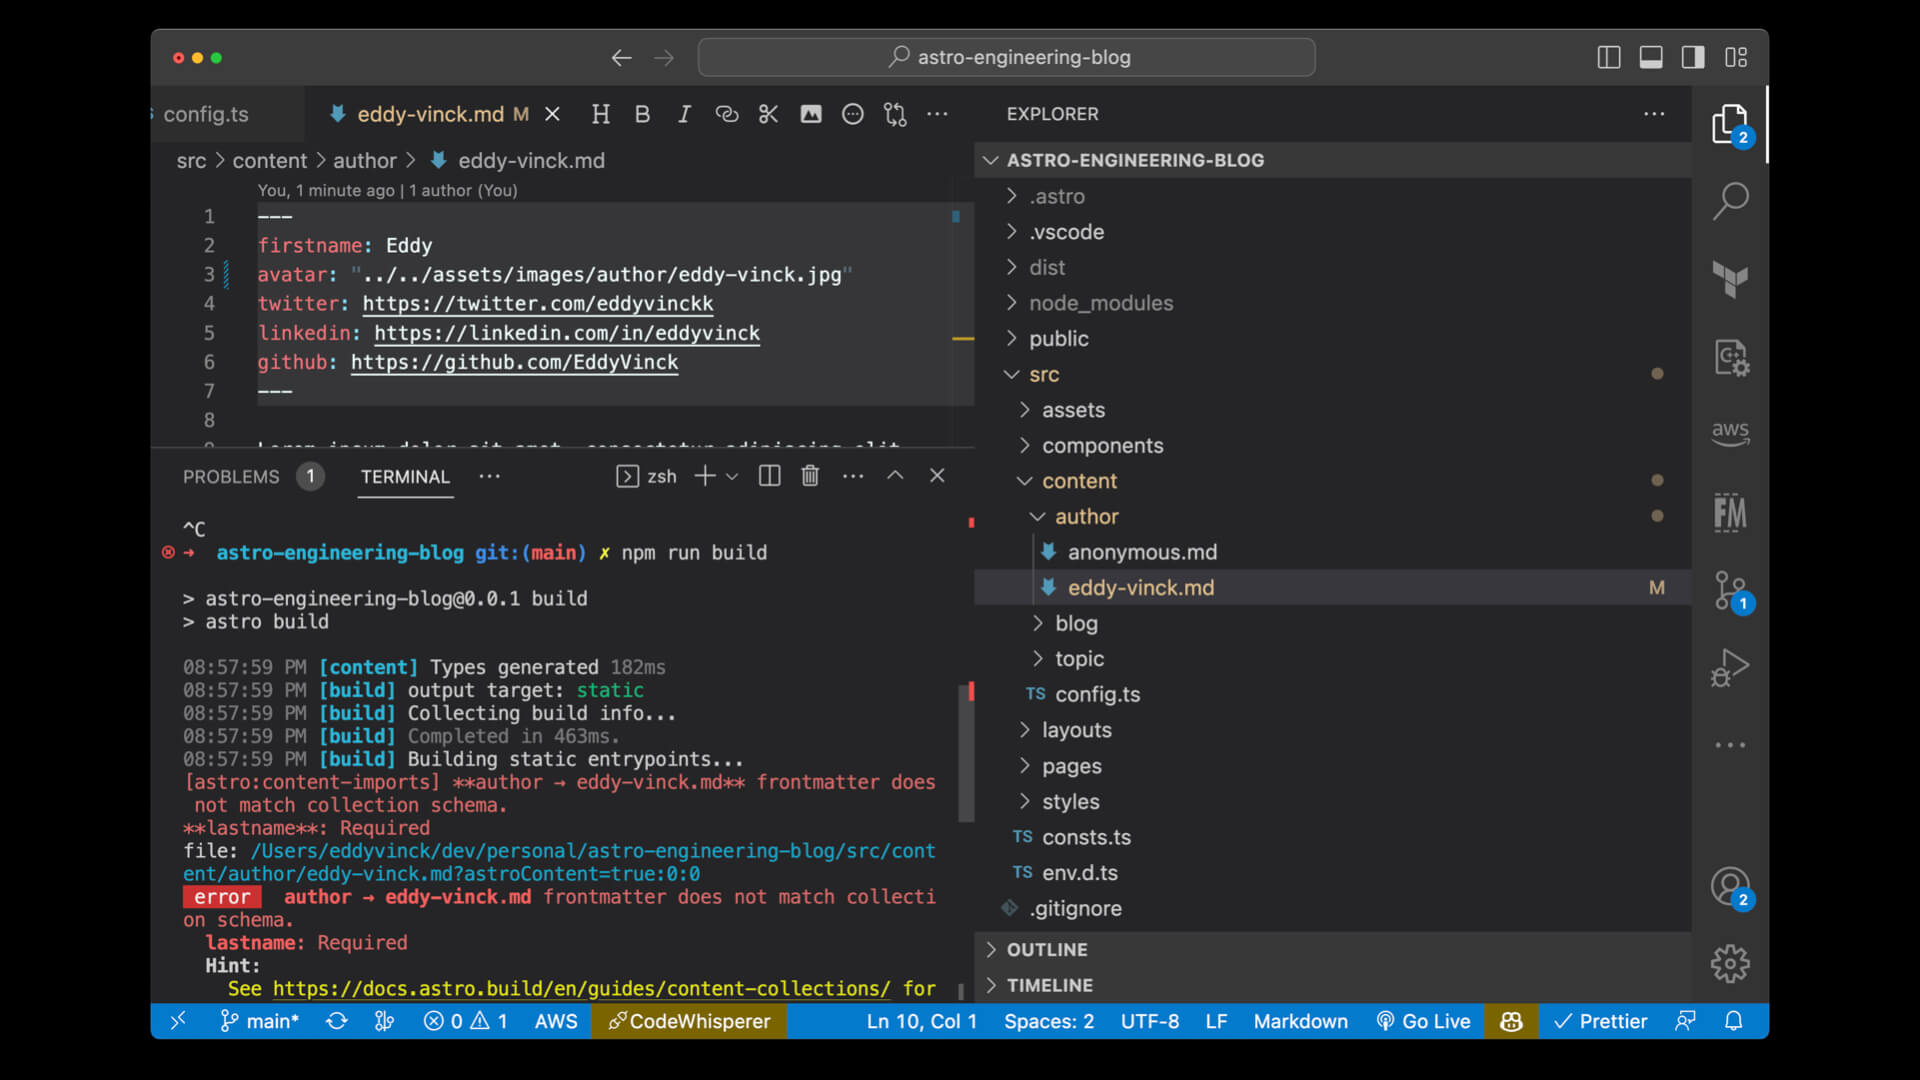
I get an error saying that lastname is required for this type of content collection.
These compilation errors are especially handy if you try to add new features at some point and forget to update one of your markdown files to include a new property.
Combining content collections with UI library components
Here is how you can combine UI library components (like Solid.js) with your content collections.
This example is a searchbar from my own Astro theme “Astro Engineering Blog”.
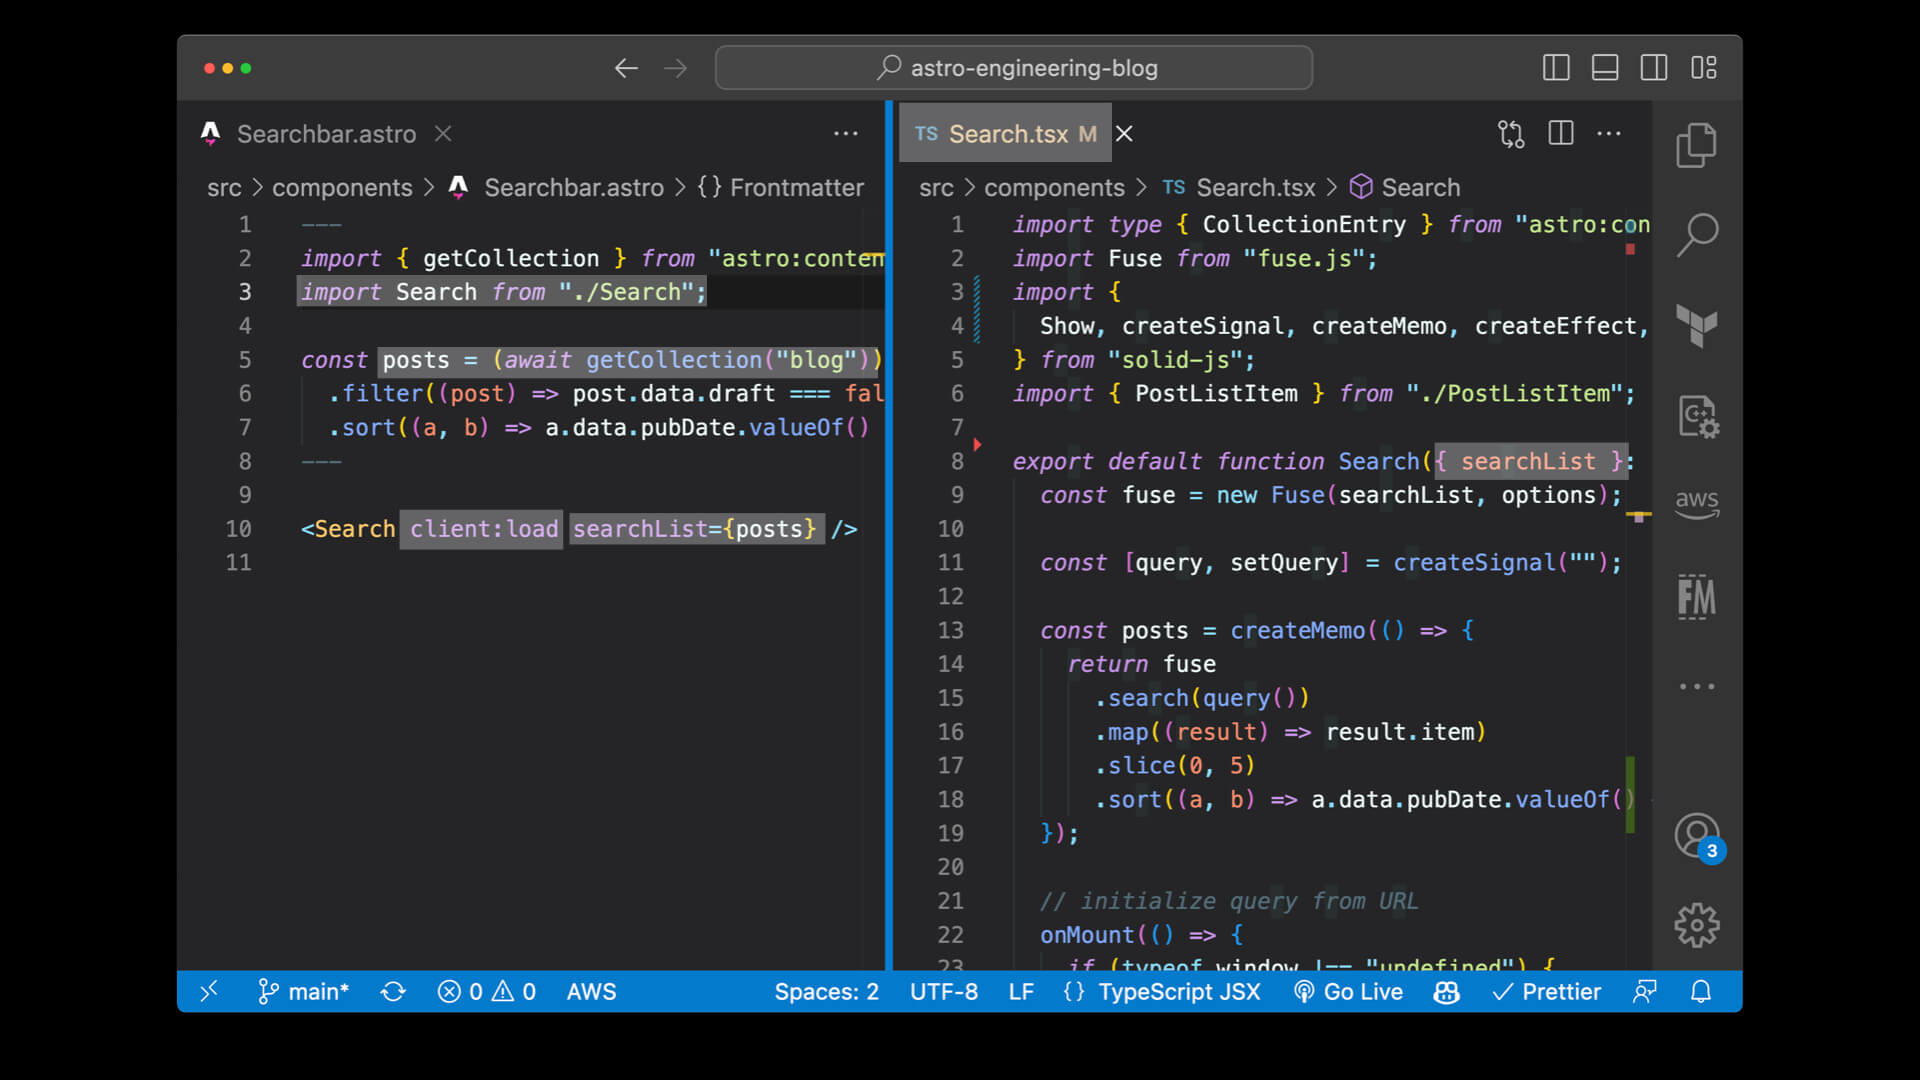
In your Astro file you can import the Solid.js searchbar and use it in the HMTL. Don’t forget to add the correct client directive so the JavaScript actually loads. Here I’m getting all the data I’ll need for my searchbar with getCollection, which gets all my posts from the blog content collection. And then I’m simply passing that data into my component as a search-list prop. That’s it.
For the searchbar Solid.js component, Astro creates an Astro Island component, and inlines all search-list data as JSON. When the Solid.js searchbar component gets rendered, it will pass the search-list data to the component.
There are other ways to go about this, like getting the data from an endpoint, but this is the most straightforward approach and it works well with statically generated websites.
Server-side rendering and hybrid rendering in Astro
Astro isn’t just for static websites. You can do server-side rendered websites with Astro. You can even combine SSR with static pages, which is called hybrid rendering.
In your astro config file, you can choose an output mode. In this config, I have chosen "hybrid":
export default defineConfig({
  output: "hybrid",
  adapter: nodejs({
    mode: "middleware",
  }),
  site: SITE_URL,
  integrations: [
    mdx(),
    sitemap(),
    solidJs({
      include: "**.tsx",
    }),
    tailwind(),
  ],
});
You can also choose "static" and "server" output modes.
The "hybrid" option allows you to mix both static and server output modes for certain pages. When you are using hybrid mode, you can export a variable called prerender to tell Astro if a page should be statically pre-rendered or not.
export const prerender = true;
If prerender is false, then your page can utilise server functionality to make it more dynamic.
Keeping your Astro projects up to date
I’ve maintained my own Astro website for a while now, and I have also kept my Astro Engineering blog template up to date.
In my experience, keeping your Astro projects up to date has been really easy.
When upgrading to a new major version of Astro, they’ll even write up an upgrade guide going over all the changes you might need to make in your codebase.
When I did this, I could just go item by item on that list, and have my website upgraded and up-to-date with the latest Astro version in less than an hour.
Your Astro project will likely have several packages for your integrations.
Astro now offers a handy CLI to upgrade all of them, so you don’t have to go over them all by hand. You can use it by running this command:
npx @astrojs/upgrade
I ran this on my project, and it showed me which ones were up to date, which weren’t, and which ones had breaking changes with a link to the change logs I need to check:

Server endpoints in Astro (API routes)
Astro allows you to create endpoints for any kind of data you need, like JSON, images, an RSS feed, or whatever else you need. It can do this at build time, but you can also have live server endpoints that support GET and POST requests.
The first option is to create static file endpoints that are turned into static files at build time. That way, you can even have an RSS feed for a statically built website, for example.
The second option is to create server endpoints. If you’ve heard of API routes from other framework, that’s the same thing.
This of course opens up a whole world of new possibilities for your Astro projects, and it enables you to create much more dynamic websites.
To tell Astro if an endpoint should be static or if it should run dynamically on the server, you need to do the same thing as with pages: export a prerender variable. If prerender equals false your endpoint will be a dynamic server endpoint (API route).
Here is a basic GET endpoint example. First you do some typical server stuff, like talking to a database, and then you return a Response.
You can also have POST and DELETE exports here, which of course will be called when those verbs are used for the incoming request method.
export const prerender = false;

export const GET: APIRoute = async (): Promise<Response> => {
  // magic server stuff

  return new Response(JSON.stringify(postReactionsRanked), {
    status: 200,
    headers: {
      "Content-Type": "application/json",
    },
  });
};
There is also an ALL verb you can export, which will match any other less specific verbs than GET, POST, and DELETE. This is what it looks like:
export const ALL: APIRoute = ({ request }) => {
  return new Response(
    JSON.stringify({
      message: `This was a ${request.method}!`,
    })
  );
};
Using a Backend-as-a-Service platform
Since Astro can basically run NodeJS endpoints, you can also use those to easily integrate with Backend-as-a-Service platforms in order to add more dynamic functionality to your website.
The Astro documentation even has some integrated guides to work with various Backend-as-a-Service providers.
Every one of them is mostly going to be integrated in the same way:
- Step 1: Add your API key
- Step 2: Install their library
- Step 3: Go build stuff
Let’s go over how I added some cool dynamic functionality to my Astro Engineering Blog template using Appwrite.
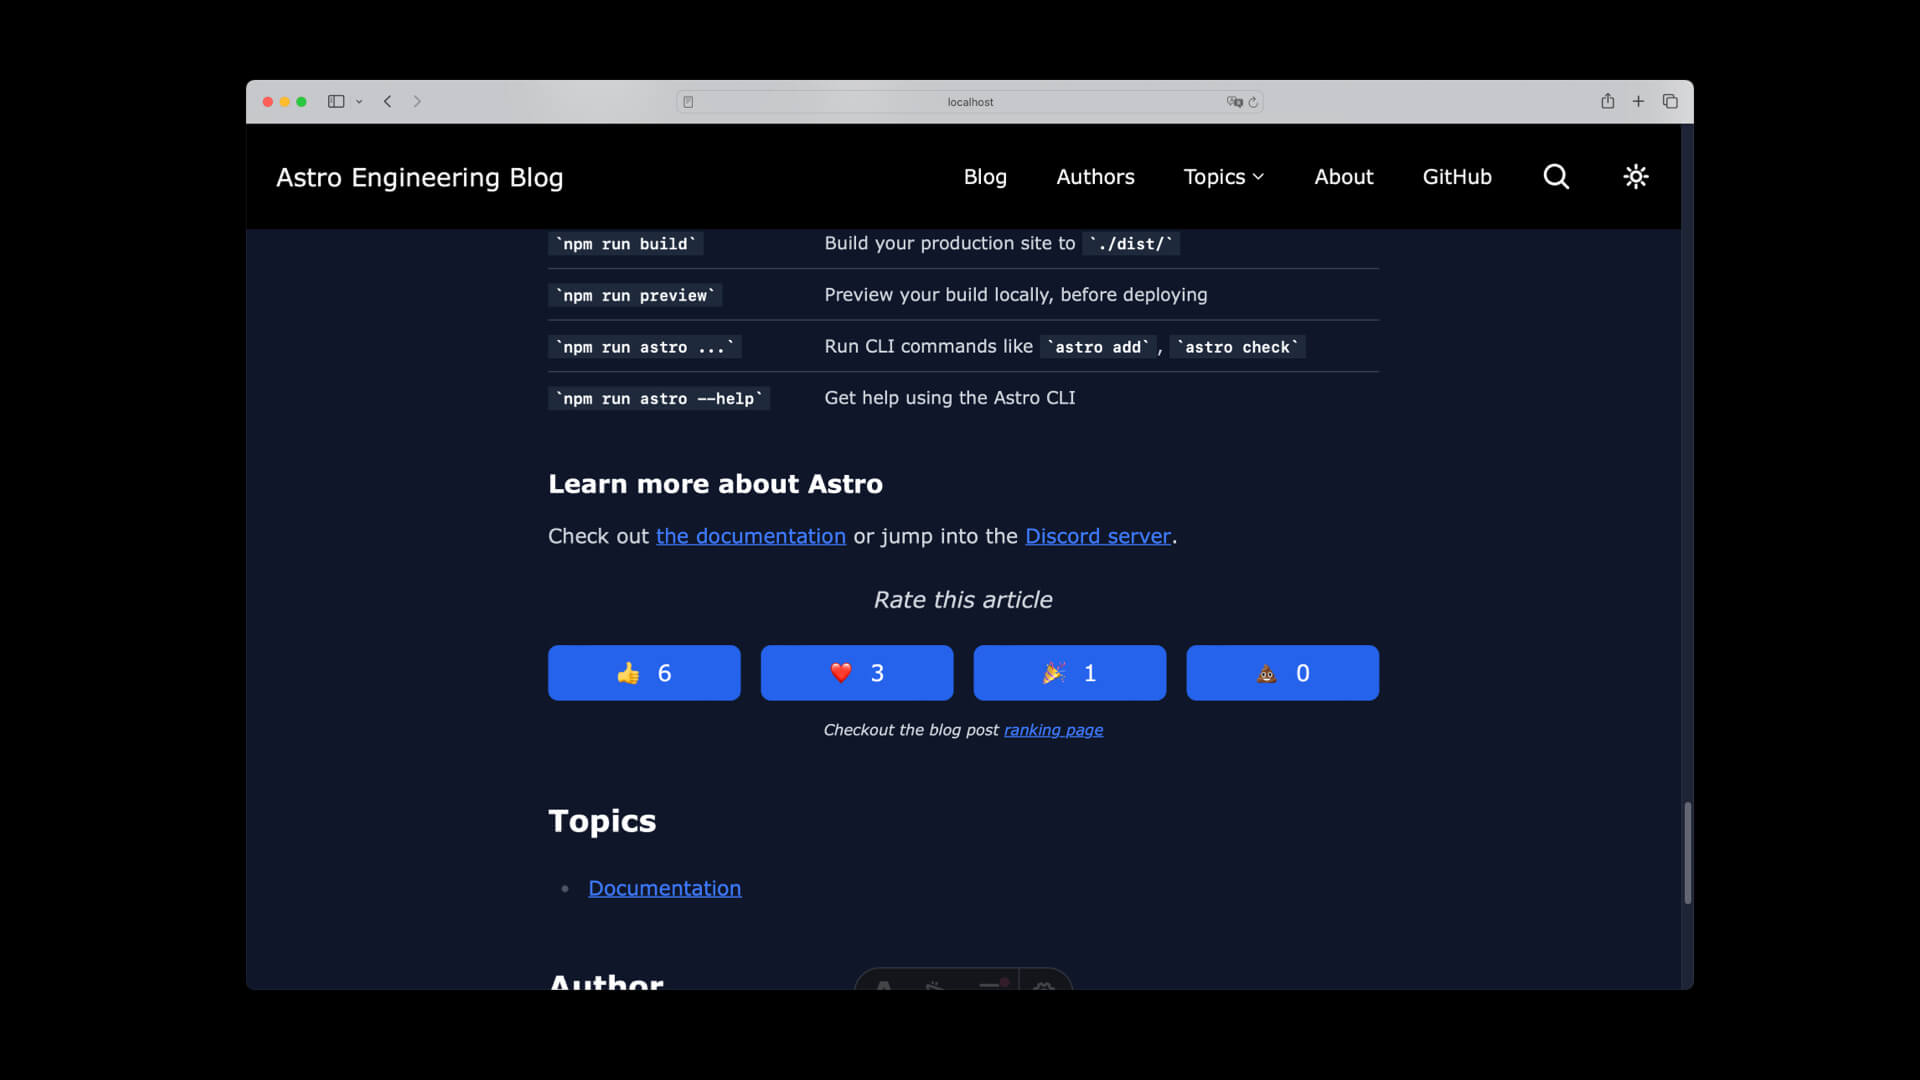
I implemented these emoji reaction buttons for every blog post for the Astro Engineering Blog theme. You’ve probably seen these before: you can click on one of the buttons below a blog post to let people know what you thought about it.
So how did I implement them?
It all starts with the getStaticPaths function that runs and creates all my blog post pages:
// pages/blog/[...page].astro
export const getStaticPaths: GetStaticPaths = async ({ paginate }) => {
  const posts = (await getCollection("blog"))
    .filter(post => post.data.draft === false)
    .sort((a, b) => b.data.pubDate.valueOf() - a.data.pubDate.valueOf());

  if (import.meta.env.SECRET_APPWRITE_API_KEY) {
    try {
      await tryInitNewBlogPostsReactionsInDatabaseCollection(posts);
    } catch (error: unknown) {
      if (error instanceof AppwriteException) {
        console.log(`⚠️  There was a problem...`);
      }
    }
  }

  return paginate(posts, {
    pageSize: PAGINATION_POSTS_PER_PAGE,
  });
};
If you don’t know what getStaticPaths does, you can use it to generate all the page URLs for a specific route, in this case, it’s going to generate page paths that come after /blog.
First, it uses the "blog" content collection to get all the posts. Then, I check if the user of the theme has an Appwrite secret API key.
If an Appwrite API key is present, then I call a function with one of the longest names in the world: try Init New BlogPosts Reactions In Database Collection.
We’ll go over the details of that function later, but let’s first take a look at how the data flows to the front-end.
Then, in every blog post page I have an Astro component EmojiReactions. In this component I check if there is an Appwrite API key, and if there is no API key present, then the component is just an empty div on the page.
This way, I made the emoji reactions integration with Appwrite completely optional. If the template user doesn’t include an Appwrite API key, then the functionality just gracefully disappears.
The Astro component renders a Solid.js component EmojiReactionButtons:
// EmojiReactions.astro
<EmojiReactionsButtons
  client:idle
  articleId={Astro.props.id}
  initialEmojiReactions={emojiReactions}
/>
Initially I just had everything in one Astro component, but you cannot use client directives on an Astro component. This is only possible in JavaScript library components, so that’s why I changed it to Solid.js. Otherwise it would include the JavaScript for the buttons, even if you weren’t using Appwrite.
Here is a simplified version of the Solid.js component. When it first gets mounted, it does a request to update the displayed emoji reactions with the latest data stored in Appwrite
Then, when someone clicks on one of the buttons, it makes an API call, and then it will update to the latest reaction data again.
// EmojiReactionsButtons.tsx
export const EmojiReactionsButtons = ({ articleId, initialEmojiReactions }) => {
const [buttonsDisabled, setButtonsDisabled] = createSignal(false);
const [emojiReactions, setEmojiReactions] = createSignal<PostReactions>(
initialEmojiReactions
);
onMount(async function getCurrentVotes() {
// fetch data ✨
setEmojiReactions(data);
});
async function handleVote(type: PostReactionOption) {
if (!articleId || buttonsDisabled()) return;
// send data ✨
setEmojiReactions(data);
}
return (
<>
{initialEmojiReactions !== null && (
<aside>
<p>Rate this article</p>
<div>
<button onClick={() => handleVote("likes")}>
👍 {emojiReactions().likes}
</button>
</div>
<p>
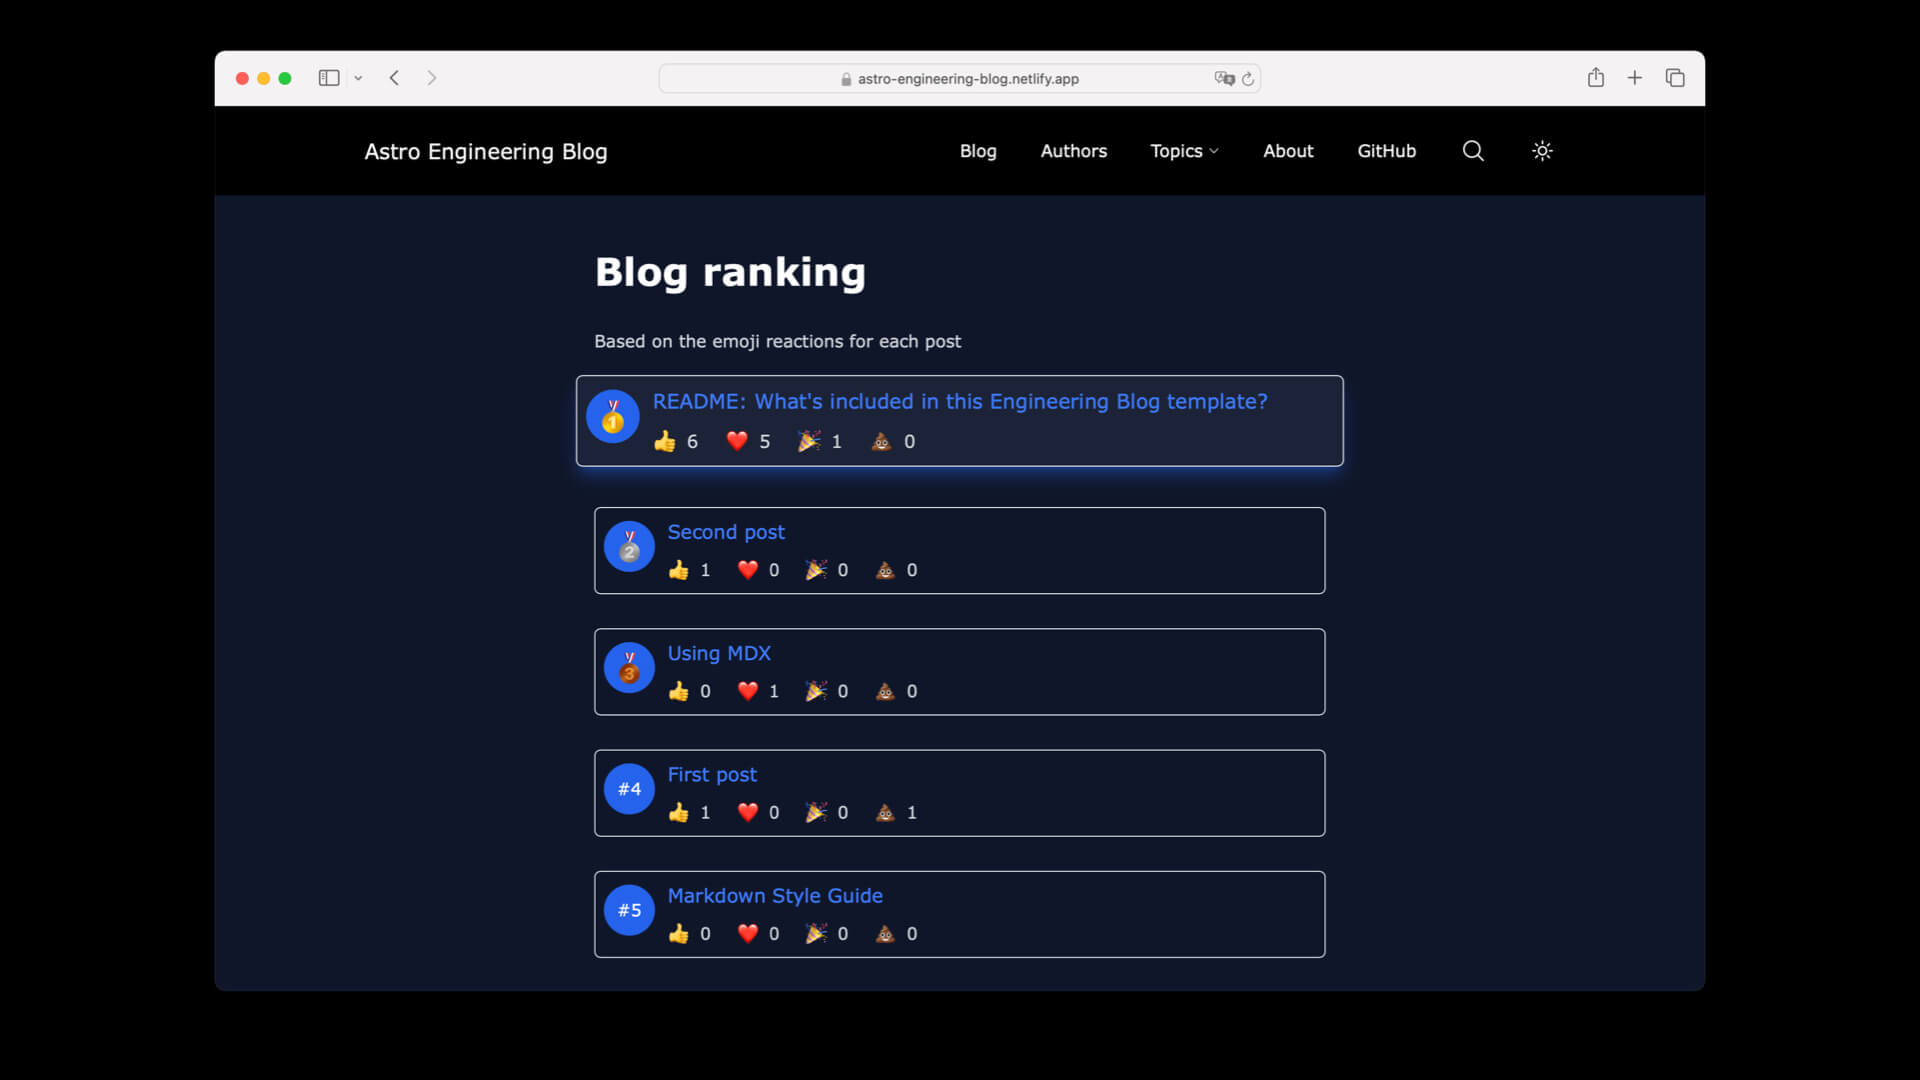
<a href="/blog-ranking">Blog post leaderboard</a>
</p>
</aside>
)}
</>
);
};
The POST endpoint to update the emoji reactions may look like a lot of code but most of it is just error handling. If you’re at least somewhat familiar with Node.js, this shouldn’t be very new. It uses the browser native Request and Response objects.
// pages/api/post-reactions/[id].ts
export const POST: APIRoute = async ({ request, params, clientAddress }) => {
  const id = params.id;
  const userIP = clientAddress;

  if (!import.meta.env.SECRET_APPWRITE_API_KEY) {
    return new Response(JSON.stringify({ error: "internal server error" }), {
      status: 500,
    });
  }

  if (!id) {
    return new Response(JSON.stringify({ error: "not found" }), {
      status: 404,
      statusText: "Not found",
      headers: headers,
    });
  }

  if (request.headers.get("Content-Type") === "application/json") {
    const body = await request.json();
    const reactionType: PostReactionOption = body.type;

    try {
      const result = await incrementEmojiReactionCount(id, reactionType);
      if (!result) throw new Error();
      let newReactions: PostReactions = {
        id: result.id,
        likes: result.likes,
        hearts: result.hearts,
        parties: result.parties,
        poops: result.poops,
      };

      return new Response(JSON.stringify(newReactions), {
        status: 200,
        headers: headers,
      });
    } catch (error) {
      console.log(`🚨 err when reacting to ID "${id}"!`, error);
    }
  }
  return new Response(null, { status: 400 });
};
This endpoint calls the incrementEmojiReactionsCount function, which is a function that does all the calls to Appwrite.
Let’s also take a look at the GET method. This one also checks if there is an Appwrite key, an ID provided as a GET parameter, and then returns the latest post reactions data:
// pages/api/post-reactions/[id].ts
export const GET: APIRoute = async ({
  params,
  clientAddress,
}): Promise<Response> => {
  const id = params.id;

  if (!import.meta.env.SECRET_APPWRITE_API_KEY) {
    return new Response(JSON.stringify({ error: "internal server error" }), {
      status: 500,
    });
  }
  if (!id) {
    return new Response(JSON.stringify({ error: "not found" }));
  }

  let postReactions = null;
  postReactions = await getPostReactionsById(id);
  if (!postReactions) {
    return new Response(JSON.stringify({ error: "not found" }));
  }

  const postReactionData: PostReactions = {
    id: postReactions.id,
    hearts: postReactions.hearts,
    likes: postReactions.likes,
    parties: postReactions.parties,
    poops: postReactions.poops,
  };

  headers.append("Content-Type", "application/json");
  return new Response(JSON.stringify(postReactionData), {
    status: 200,
    headers: headers,
  });
};
Let’s take a look at how the communication with Appwrite works. Here is a function that is responsible for making sure you have the right database and database collection for the emoji reactions feature. It checks if you already have them, and if not, it creates them for you via Appwrite’s SDK.
// appwrite.server.ts
import { Client, Databases } from "node-appwrite";

/** Setup */
export const appwriteServerClient = new Client()
  .setEndpoint(PUBLIC_APPWRITE_ENDPOINT)
  .setProject(PUBLIC_APPWRITE_PROJECT_ID)
  .setKey(env.SECRET_APPWRITE_API_KEY);
const appwriteDatabases = new Databases(appwriteServerClient);

const initializeEmojiReactionsCollection = async () => {
  try {
    await appwriteDatabases.get(PUBLIC_APPWRITE_DATABASE_ID);
    console.log("✅ Database found!");
  } catch (error) {
    await appwriteDatabases.create(
      PUBLIC_APPWRITE_DATABASE_ID,
      PUBLIC_APPWRITE_DATABASE_ID,
      true
    );
    console.log(
      `Created new Appwrite database: ${PUBLIC_APPWRITE_DATABASE_ID}`
    );
  }

  try {
    await appwriteDatabases.getCollection(
      PUBLIC_APPWRITE_DATABASE_ID,
      PUBLIC_APPWRITE_EMOJI_REACTIONS_COLLECTION_ID
    );
    console.log("✅ Emoji reactions collection found!");
  } catch (error) {
    await appwriteDatabases.createCollection(
      PUBLIC_APPWRITE_DATABASE_ID,
      PUBLIC_APPWRITE_EMOJI_REACTIONS_COLLECTION_ID,
      PUBLIC_APPWRITE_EMOJI_REACTIONS_COLLECTION_ID
    );
    console.log(
      `Created new Appwrite collection: ${PUBLIC_APPWRITE_EMOJI_REACTIONS_COLLECTION_ID}`
    );
  }
};
And then there is a function that runs the previous one to make sure you have the database and collection.
It checks the blog posts that have already been added to Appwrite, and it compares those to all the markdown files in your Astro content collection.
Any posts that weren’t in Appwrite yet will then be added with 0 reactions as the initial data.
And again, this runs in your getStaticPaths function, so any time you run this locally or when you build your website in a pipeline, your new posts will be added to Appwrite, so you can essentially just forget about it, you don’t have to manage it by hand.
// appwrite.server.ts
export const tryInitNewBlogPostsReactionsInDatabaseCollection = async (
  posts: Array<CollectionEntry<"blog">>
) => {
  await initializeEmojiReactionsCollection();
  const dbPosts = (
    await appwriteDatabases.listDocuments<PostReactionsDocument>(
      PUBLIC_APPWRITE_DATABASE_ID,
      PUBLIC_APPWRITE_EMOJI_REACTIONS_COLLECTION_ID
    )
  ).documents;

  const newPosts: PostReactions[] = [];
  for (let i = 0; i < posts.length; i++) {
    const post = posts[i];
    if (!dbPosts.find(({ id }) => id === post.data.id)) {
      newPosts.push(getInitialPostData(post.data.id));
    }
  }

  if (newPosts.length > 0) {
    const promises = newPosts.map(newPost => {
      return appwriteDatabases.createDocument(
        PUBLIC_APPWRITE_DATABASE_ID,
        PUBLIC_APPWRITE_EMOJI_REACTIONS_COLLECTION_ID,
        ID.unique(),
        newPost
      );
    });

    Promise.all(promises).then(results => {
      console.log(`All new ${results.length} posts have been initialized`);
    });
  }
};
To get the post reactions for a specific post ID, we need to search the list of documents in Appwrite with that ID:
// appwrite.server.ts
export const getPostReactionsById = async (id: string) => {
  try {
    const list = await appwriteDatabases.listDocuments<PostReactionsDocument>(
      PUBLIC_APPWRITE_DATABASE_ID,
      PUBLIC_APPWRITE_EMOJI_REACTIONS_COLLECTION_ID,
      [Query.equal("id", [id])]
    );
    const document = list.documents[0];
    return document;
  } catch (error) {
    if (error instanceof Error) {
      console.log(
        `Could not get post reaction data for "${id}"`,
        error.message
      );
    }
    return null;
  }
};
And to update the post reactions when you press one of the reaction buttons, we need to get the latest data in Appwrite again.
Then you simply add 1 to the last count for that thumbs up button that was just clicked, and you use that data to update the document in Appwrite so the data is saved.
At the end, the result is returned with the actually updated data from Appwrite, and that is in turn used to update the numbers in the reaction buttons.
export const incrementEmojiReactionCount = async (
  articleId: string,
  emojiType: PostReactionOption
) => {
  const list = await appwriteDatabases.listDocuments<PostReactionsDocument>(
    PUBLIC_APPWRITE_DATABASE_ID,
    PUBLIC_APPWRITE_EMOJI_REACTIONS_COLLECTION_ID,
    [Query.equal("id", [articleId])]
  );

  const document = list.documents[0];
  const prevCount = document[emojiType];
  const newCount = prevCount + 1;

  const result = await appwriteDatabases.updateDocument<PostReactionsDocument>(
    PUBLIC_APPWRITE_DATABASE_ID,
    PUBLIC_APPWRITE_EMOJI_REACTIONS_COLLECTION_ID,
    document.$id,
    {
      [emojiType]: newCount,
    }
  );

  return result;
};
And then there is one more function. This one fetches the list of articles from Appwrite again, but it also passes some sorting criteria and it limits the list to just 20 posts. This function is used to create a leaderboard of the most popular posts:
export const getPostReactionsRanked = async (): Promise<
  PostReactions[] | null
> => {
  try {
    const list = await appwriteDatabases.listDocuments<PostReactionsDocument>(
      PUBLIC_APPWRITE_DATABASE_ID,
      PUBLIC_APPWRITE_EMOJI_REACTIONS_COLLECTION_ID,
      [
        Query.orderDesc("likes"),
        Query.orderDesc("hearts"),
        Query.orderDesc("parties"),
        Query.orderDesc("poops"),
        Query.limit(20),
      ]
    );

    return list.documents.sort((postA, postB) => {
      // Array.sort() magic ✨
    });
  } catch (error) {
    if (error instanceof Error) {
      console.log(
        `Could not get post reaction data for ranking`,
        error.message
      );
    }
    return null;
  }
};
I’ve simplified some of the code for this article. For the full and latest version of the code, you can take a look at the Engineering Blog theme’s code on GitHub.
View transitions
Let’s get back to an Astro specific feature: View transitions. They’re those fancy animations that animate your transitions between pages. This can be a simple fade in and out, or something more complex.
By default, view transitions are not enabled in Astro, but it’s very easy to enable them.
All you need to do, is add Astro’s
And then you add transition:animate to the elements you want to animate, plus an optional transition name that will help Astro figure out which elements to replace between transitions.
If you don’t include this transition name, then Astro will just try to figure it out on it’s own by checking the location in the DOM.
And if you don’t want certain elements to animate, you can add transition:persist.
Here is an example on how you can enable view transitions:
---
// layouts/your-layout.astro
import BaseHead from "../components/BaseHead.astro";
import Header from "../components/Header.astro";
import Footer from "../components/Footer.astro";
import { ViewTransitions } from "astro:transitions";
---

<html lang="en">
  <head>
    <BaseHead title={title} description={description} />
    <ViewTransitions />
  </head>

  <body>
    <Header transition:persist />
    <main transition:name="transition-content" transition:animate="slide">
      <slot />
    </main>
    <Footer />
  </body>
</html>
Conclusion: Should you use Astro?
I think so.
Astro is a great framework, and there’s many benefits to using Astro as we discussed, so IF you are building a content-focused website, at least I think it could be a great fit for your project, and you should give it a try.
So go to astro.build sometime, and give it a shot for your next project. Any maybe check out the engineering blog template I made while you’re at it.
That was a long article. I hope it gave you a good overview of Astro, and I hope you give it a try for one of your projects. It’s become one of my go-to tools in my toolbox.